In the past, this meant hunting for a local SIM card, dealing with language barriers, and navigating complicated registration processes. Today, there’s a much simpler solution: the eSIM.
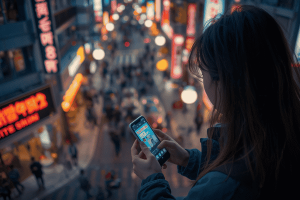
So, can you use an eSIM in Indonesia? The answer is a resounding yes. This digital SIM technology is revolutionizing how we stay connected while traveling. It eliminates the need for physical SIM cards, allowing you to activate a mobile data plan directly on your phone. This guide is your complete resource for understanding and using an eSIM in Indonesia. We’ll cover everything from how eSIMs work and why they’re a game-changer for travelers to a step-by-step guide on getting set up. Say goodbye to connectivity headaches and hello to seamless travel.
What is an eSIM and How Does it Work?
Before we dive into the specifics for Indonesia, let’s get clear on what an eSIM is. The “e” in eSIM stands for “embedded.” Unlike a traditional SIM card, which is a physical chip you insert into your phone, an eSIM is a small chip that is built directly into your device’s hardware. You can’t remove it, but you can digitally add, change, or remove mobile plans on it. Think of it as a rewritable SIM card that lives inside your phone.
This technology has been gaining traction since it was first introduced in devices like the Google Pixel 2 and Apple Watch Series 3. Now, most modern smartphones from major brands like Apple, Samsung, and Google come with eSIM compatibility. This shift marks a significant evolution in mobile connectivity, moving from physical hardware to flexible software.
The process of using an eSIM is simple. Instead of buying a physical card, you purchase a data plan from a provider like Terminal eSIM. You then receive a QR code or an activation link. By scanning this code or following the link in your phone’s settings, you install a “profile” onto your embedded chip. This profile contains all the information needed to connect to a local mobile network. You can store multiple eSIM profiles on one device, making it incredibly easy to switch between plans or carriers. For example, you can keep your home plan active on one eSIM while using a travel eSIM for data abroad, all on the same phone. This dual-SIM capability gives you the best of both worlds: you can still receive calls and texts on your primary number while enjoying affordable local data rates.

Your Practical Guide to Using an eSIM Indonesia Plan
Getting connected with an eSIM Indonesia plan is straightforward and can be done in minutes, even before you leave home. This preparation ensures you have data the moment your plane touches down. Here’s a step-by-step guide to get you started.
Step 1: Check Your Device’s Compatibility
First and foremost, confirm that your smartphone is eSIM-compatible. Most newer models are, but it’s always best to check.
- For iPhone: Go to Settings > Cellular (or Mobile Data). If you see an option like “Add eSIM” or “Add Cellular Plan,” your device is compatible. This feature is generally available on iPhone XS, XR, and newer models.
- For Android: The path varies by manufacturer. On a Samsung device, you might go to Settings > Connections > SIM Card Manager. On a Google Pixel, check under Settings > Network & Internet. Look for an option to add a network via QR code or an “Add eSIM” button.
Step 2: Choose and Purchase Your eSIM Plan
Once you’ve confirmed compatibility, it’s time to select a plan that fits your travel needs. Providers like Terminal eSIM offer a variety of options specifically for Indonesia. Consider these factors when choosing:
- Data Amount: How much data will you need? A 1GB plan might be enough for a short trip with light usage (maps, messaging), while a 10GB or 20GB plan is better for longer stays, streaming, or remote work.
- Validity Period: Plans come with a set duration (e.g., 7 days, 15 days, 30 days). Match the plan’s validity to the length of your trip.
- Coverage: Ensure the eSIM partners with major Indonesian networks like Telkomsel, XL Axiata, or Indosat Ooredoo for reliable coverage across the islands.
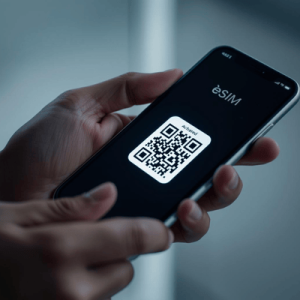
Purchase your chosen plan online. You’ll receive an email with your activation details, usually a QR code.
Step 3: Install and Activate Your eSIM
It’s best to install your eSIM while you still have a stable internet connection at home or at the airport.
- Connect to Wi-Fi.
- Go to your phone’s cellular or mobile data settings and select the option to “Add eSIM.”
- Choose the option to use a QR code and scan the code from your confirmation email. Your phone may prompt you to enter a confirmation code if one was provided.
- Follow the on-screen prompts to label your new eSIM (e.g., “Indonesia Travel”) and set its role. It’s recommended to set it as your primary source for “Cellular Data” but keep your home SIM as the “Default Voice Line” to continue receiving calls and texts on your main number.
Step 4: Activate Upon Arrival
Once you land in Indonesia, simply turn on your travel eSIM.
- Go back to Settings > Cellular.
- Select your newly installed eSIM.
- Toggle on “Turn On This Line” and “Data Roaming.” Your phone will automatically connect to a local network, and you’ll be online instantly.
Comparing Connectivity Options: eSIM vs. Local SIM vs. Roaming
When traveling to Indonesia, you have three main options for staying connected: using an eSIM, buying a local physical SIM card, or enabling international roaming with your home provider. Each has its pros and cons. An eSIM often provides the best balance of convenience, cost, and control for the modern traveler.
Here’s a comparison to help you decide which is right for your trip:
| Feature | eSIM (e.g., Terminal eSIM) | Local Physical SIM | International Roaming |
| Convenience | Excellent. Purchase and install online before you travel. No physical swap needed. | Fair. Requires finding a store, filling out paperwork, and registering with your passport. | Excellent. Activated with a simple call to your provider or through an app. |
| Cost | Excellent. Highly competitive, prepaid data plans with no hidden fees. | Good. Generally affordable, but prices can vary, and you might overbuy data. | Poor. Typically the most expensive option, with high per-MB rates or costly daily passes. |
| Activation Time | Instant. Activate upon arrival in seconds. | Slow. Can take 30 minutes to a few hours, including travel time to the store and registration. | Instant. Works as soon as you land. |
| Flexibility | High. Store multiple eSIMs and switch between them easily. | Low. Tied to one physical card. To switch, you need to buy and insert a new SIM. | Low. Locked into your home provider’s plans and partners. |
| Keeping Home Number | Yes. Your primary SIM remains active for calls and texts. | No. You must remove your home SIM, losing access to calls/texts on that number. | Yes. You use your existing number for all services. |
| Best For | Tech-savvy travelers, short-term visitors, digital nomads, and anyone wanting immediate connectivity. | Budget-conscious travelers on long stays who don’t mind the initial setup process. | Business travelers on very short trips where cost is not a primary concern and convenience is key. |
The key takeaway from this comparison is that an eSIM Indonesia plan offers unparalleled convenience. The ability to set up your connectivity before your trip and activate it instantly upon landing eliminates a major travel stressor. While local SIMs are cheap, the time and effort required for registration—including providing your passport and IMEI number—can be a hassle. International roaming is the simplest but often comes at a prohibitively high cost. For most travelers, an eSIM provides the ideal blend of affordability and ease of use.
Common Questions and Solutions for Using an eSIM in Indonesia
Even with a straightforward setup, you might have some questions or concerns about using an eSIM for the first time in Indonesia. Here are answers to some frequently asked questions to ensure your experience is smooth and trouble-free.
FAQs about eSIM Indonesia
- What happens if I use up all my eSIM data?
Most eSIM providers, including Terminal eSIM, make it easy to top up your data. You can typically purchase another data pack or a new plan directly through the provider’s website or app. Since the eSIM is already installed on your device, the new data pack can be activated instantly without needing to scan another QR code. It’s a good idea to monitor your data usage through your phone’s settings to avoid running out unexpectedly. - Can I make phone calls with my eSIM Indonesia plan?
This depends on the plan you purchase. Most travel eSIMs are “data-only,” meaning they do not come with a local phone number and cannot be used for traditional cellular calls or SMS texts. However, this is rarely an issue for modern travelers. You can use data to make calls and send messages through apps like WhatsApp, FaceTime Audio, Telegram, or Skype. This method is often cheaper and more versatile. If you need to receive calls on your regular number, you can keep your primary SIM active for that purpose. - Is eSIM coverage good throughout Indonesia?
Yes, eSIM coverage is generally excellent in Indonesia. eSIM providers partner with the country’s leading mobile network operators, such as Telkomsel and XL Axiata. These networks have extensive infrastructure that covers major tourist destinations like Bali, Java, and Lombok, as well as major cities and towns. While you might experience weaker signals in very remote rural areas or on smaller, less-populated islands (just as you would with a local SIM), you can expect reliable 4G/LTE connectivity in most places you’re likely to visit. - Do I need to register my IMEI number when using a travel eSIM?
One of the biggest advantages of using a travel eSIM for a short trip is that you typically do not need to deal with Indonesia’s IMEI registration rules. These regulations were designed to combat the black market for mobile phones and primarily apply to devices purchased abroad that will be used with a local Indonesian SIM card for more than 90 days. Since a travel eSIM is a temporary, tourist-focused service, you can bypass this complicated and sometimes costly registration process, saving you time and money upon arrival.
Summary: Your Key to Seamless Indonesian Connectivity
Navigating a new country is an adventure, and having a reliable internet connection from the moment you arrive makes it all the more enjoyable. An eSIM for Indonesia offers precisely that: a simple, affordable, and powerful way to stay connected without the traditional hassles of international travel.
We’ve covered how this embedded technology works, providing a digital-first alternative to physical SIM cards. By following a few simple steps—checking your device’s compatibility, choosing a plan that fits your needs, and installing it via a QR code—you can have your data ready before your flight even takes off. Activating it upon landing is as easy as flipping a switch in your phone’s settings.
Comparing it to other options, the eSIM stands out. It avoids the high costs of international roaming and sidesteps the time-consuming registration process required for local SIM cards. It gives you the flexibility to keep your home number active for important calls and texts while using affordable local data for everything else. With answers to common questions about data top-ups, calling capabilities, and network coverage, you can travel with confidence, knowing you have a reliable digital tool at your fingertips.
Stay Connected in Indonesia with Terminal eSIM
Your trip to Indonesia should be about exploring ancient temples, relaxing on pristine beaches, and tasting incredible food—not worrying about finding Wi-Fi or paying for expensive data. An eSIM frees you to experience your journey to the fullest. For digital nomads needing to stay productive, families wanting to share their adventures, or solo travelers navigating new cities, seamless connectivity is essential.
With Terminal eSIM, you get access to fast, reliable data across Indonesia through top-tier local networks. Our plans are designed for every type of traveler, offering a range of data packages and validity periods to match your itinerary perfectly. Forget about SIM card swaps and airport kiosk queues. Set up your connection in minutes from the comfort of your home and land in Indonesia ready to go.
Explore our affordable and convenient eSIM Indonesia plans today and make connectivity the easiest part of your travel planning.